Hey, I'm a tech enthusiast, currently working as a founding engineer at Dashwave.
My average day constitutes of implementing solutions to typical software problem statements and building code pipelines and infras. I've always had a keen interest in devops and I love building intelligent and automated infra which can do all cool stuff like scaling and self-repairing all on its own.
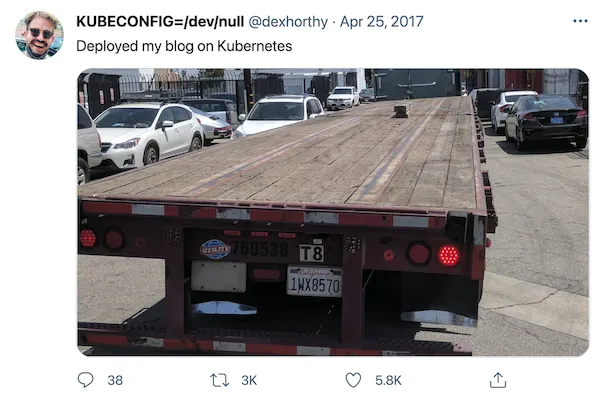
One of the problems I encountered while implementing our infrastructure was deploying some jobs (think of them as docker containers running across nodes), and exposing each container as service accessible through a https url. We are using Nomad as an orchestrator for managing these jobs, since it is much lighter than K8s. For people who think K8s's still a better option?
 K8S is not the solution to everything
So, let us start with basic understanding of the architecture. We have a few jobs (docker containers) running across some nodes (cloud instances with public ip). We have no direct control over the allocation of job vs node, because that is handled by Nomad, but we won’t get into it in this article. So, we simply assume that jobs might be allocated randomly across nodes.
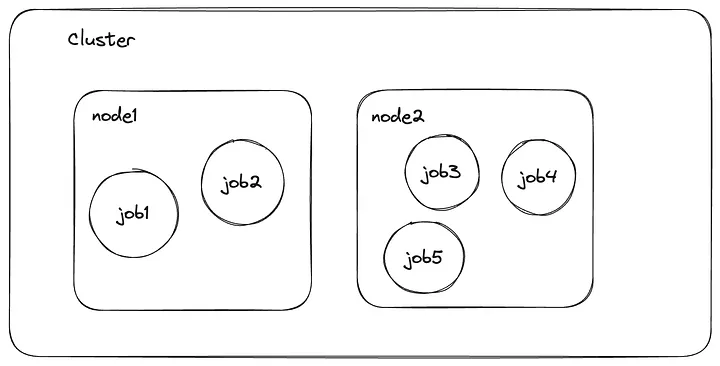 5 Jobs running across 2 nodes
We want to expose each job independently through a url. Let us call this url as the resource url used to access a resource (the job). With jobs running in this architecture, we might access a resource by accessing the url <public_ip_of_node>:<port_mapping_of_job>, given that the container port of the job is mapped to a instance port and that node allows incoming request on the port.
Let us think about how should the resource url of a job look like? Let’s assume that node1, node2 are some IDs assigned to the node that is registered in the cluster and similarly job1, job2 … are IDs assigned to the jobs dispatched. So a resource url for a job might look like:
job1.node1.resource.live or job3.node2.resource.live , where resource.live is the base domain we own, and <jobid>.<nodeid> acts as a subdomain to resolve to the required job at the deployed node.
We need 2 layers of proxies to resolve the correct node and job for a given resource url. These 2 layers in our case would be:
- A DNS Service for node resolution
- A Reverse Proxy — Caddy for job resolution
We can use any DNS Provider like Cloudflare, GoDaddy for DNS resolution. We simply need to add a wildcard DNS entry with type=alias, name=*.nodeid and address as node public address.
Then on each node, we need to run a Caddy docker container, which runs as a reverse proxy server. A reverse proxy server is a simple service which routes a request to a certain port by identifying the subdomain of the request. The reverse proxy server already contains a mapping which tells it that which subdomain request is to be mapped (or proxied) to which port.
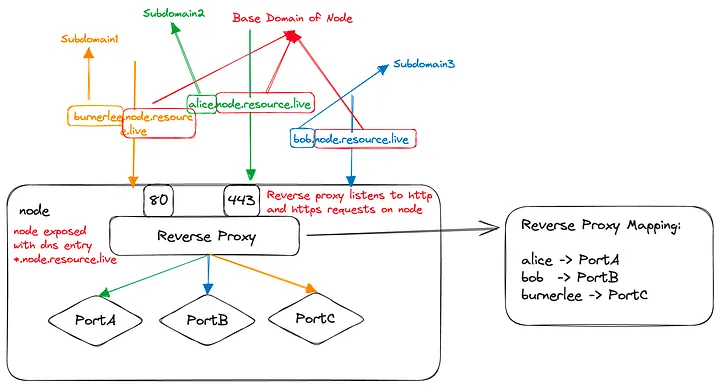 Working of a simple reverse proxy server
There are multiple reverse proxy servers available. In fact, Nginx and Apache are most widely used and most efficient reverse proxy available for free.
Why efficient? You see, since each request a user makes on the resource passes through this proxy, as a developer you’d want this process of port resolution from subdomain to happen with as low latency as possible.
But we decided to use Caddy, that is not so efficient, and not so reliable, breaks sometimes, shows unexpected behaviour, but still gets the job done for us.
The most important reason is that Caddy allows updating the reverse proxy mapping dynamically through APIs which is not supported in Nginx or apache. So, whenever a new job is dispatched to a node, we can add an entry to Caddy to map the subdomain to the service port and whenever a job is removed, we remove this entry.
So, if we bring together all the pieces we have discussed until now, we would be able to access a resource at [http://job1.node1.resource.live](http://job1.node1.resource.live/) But, there is still a piece of the puzzle missing before you take your infra to prod. Any guesses?
HTTPS
The resources don’t support the HTTP Secure protocol yet, since certificates are not issued for the resource domains. This would interrupt you to use these resources in a HTTPS website, since HTTPS sites only support HTTPS resources, and it would be bad idea to take HTTP resources to production. The one who is familiar with the process of issuing HTTPS certificates for a domain would most probably understand that it is going to be a troublesome tasks of issuing certificates for each of the resource and that too on the go. There are certain reasons for this:
- There is a hard rate limit on the number of certificates you can issue in a time interval from ACME
- The most general way to generate certificates is to manually generate them using certbot cli tool and then refer the generated files in reverse proxy configurations.
Luckily for us, Caddy makes life a lot easier by automating this whole process without much hassle. Ah, one more reason to use this mischievous tool :P. As they mention in their docs:
Caddy is the first and only web server to use HTTPS automatically and by default.
Caddy can be configured to listen at port 80 (HTTP) or 443 (HTTPS) or both. When caddy is listening at 443, it automatically configures https certificates whenever a new subdomain entry is added. By default, Caddy uses LetsEncrypt to issue certificates.
LetsEncrypt is a nonprofit Certificate Authority providing TLS certificates to 300 million websites. Caddy makes a request to LetsEncrypt to issue certificates by verifying the authenticity of the ip the domain is registered to. Caddy fetches these certificates and loads them for the subdomain at runtime. Caddy even handles re-issuing certificates after expiry, or retrying for certificates in-case the rate-limit is exceeded. So, Caddy makes life very easy by automating all these tasks.
However, there are certain limitations to this default behaviour of Caddy certificate issue:
Some challenges mentioned in Caddy’s official documentation are here.
In addition to these, our problem statement involves deploying jobs which can scale to a large number. Hence, if we were to issue a certificate for each resource (job), we would need to get N certificates for N resources. But we are restricted by 2 limitations in the certificate issue rate:
- Number of certificates that can be issued in a longer frame of time (1 week). This is set to 50 by LetsEncrypt since it is free.
- Certificate issue rate limit on a smaller frame of time. This is implemented by ACME, to limit the number of API calls and handle traffic.
So, it is easy to deduce that if we were to use LetsEncrypt, we would only be able to host a maximum of 50 resources in our infrastructure in a week. If this fits our use case, we can simply skip the further steps of configuring ZeroSSL and continue from here.
An easy solution to this would be to use a paid alternative of LetsEncrypt like ZeroSSL to get rid of the maximum number of certificates I can issue.
ZeroSSL and LetsEncrypt are both ACME CA clients that issue certificates. It is important to understand that both finally depend on ACME for certificate issuance.
So we configure Caddy to use ZeroSSL by specifying the cert_issuer in Caddyfile to zerossl and specifying the ZeroSSL API Key. To get an API key, signup for an account on ZeroSSL and create a new key from developer dashboard.
HTTPS certificate validation steps involve authenticating whether you’re the valid owner of the domain for which certificate is issued. This involves verifying the domain with your DNS provider, and creating a TXT DNS entry by ACME. More about this here
To configure caddy to automate these steps, we need to configure acme_dns client for Caddy. In my case, my DNS provider is Cloudflare, so my Caddyfile looks like the following:
{
    acme_dns cloudflare <dns-api-key>
    cert_issuer zerossl <zerossl-api-key>
}
But wait hang on, Caddy, by default might not contain the plugin for your DNS provider. So, you might have to build Caddy binary on your own along with the dns plugin you want to use (as mentioned here), or download Caddy+Plugin binary directly from here.
Finally, we’re good to go!! (are we? :P)
Now, when we add a subdomain entry to Caddy listening to port 443, it automatically handles everything and makes sure that your resource is available at https. However, the certificate process takes some time to complete (around 30 secs) and until then you might face SSL_PROTOCOL_ERR
So coming back to the architecture we started from — 5 jobs distributed over 2 nodes, we would have issued 5 certificates from our ZeroSSL account. These certificates would be issued for the domains:
job1.node1.resource.livejob2.node1.resource.livejob3.node2.resource.livejob4.node2.resource.livejob5.node2.resource.live
However, if you want to dispatch a large number of new jobs (resources) at once, we would face the following issues:
- We would hit the rate limit set by ACME we talked about earlier.
- Also, we would end up generating a large number of certificates, each for one job.
- Also each job will take time for complete deployment, since Caddy will fetch certificates for each job serially, which is a slow process. So in our scenario, Caddy will first fetch certs for job3 on node2, then job4 and then job5. So, if a large number of jobs are dispatched on a single node at once, we will experience a delay in all jobs being ready.
Can we do better?
Wildcard Certificates
Here, we use the power of wildcard certificates. The concept is simple -> Issue a certificate for a patterned domain rather than a static domain. This means that rather than issuing 2 certificates for:
job1.node1.resource.livejob2.node1.resource.live
Issue a single certificate for *.node1.resource.live This certificate can be used to authenticate both the above resource domains. A wildcard certificate basically says — Hey this IP is authenticated for all the domain names of the pattern *.node1.resource.live So, now whenever a new job is dispatched to node1 , it creates a new entry in Caddy mapping, and it uses the same certificates.
So, with this the number of certificates required to dispatch N jobs across M nodes comes down to M. Considering, a node might host K jobs, we have reduced the number of certificates issued by a factor of K.
Also, this wildcard certificate can be issued at the time of initialisation of Caddy server, and when a new job is dispatched, Caddy process does not need to wait 20 secs for certificate process to get completed for each job.
Here is some golang code which defines functions to make a call to Caddy server for initialisation and adding reverse proxy.
The following file defines some basic structs and variables to be used by later functions:
// types.go
package caddy

var putConfigEndpoint string = "/config/apps/http/servers/srv0/routes/0"

var initConfigEndpoint string = "/config/apps/http/servers/srv0"

type CaddyConf struct {
 BaseEndpoint  string
 CaddyEndpoint string
}

func InitCaddy(baseEndpoint, caddyEndpoint string) *CaddyConf {
 return &CaddyConf{BaseEndpoint: baseEndpoint, CaddyEndpoint: caddyEndpoint}
}

type Match struct {
 Host []string `json:"host"`
}

type Handle struct {
 Handler string   `json:"handler"`
 Routes  []Routes `json:"routes"`
}

type Routes struct {
 Handle []RouteHandle `json:"handle"`
 Match  []Match       `json:"match"`
}

type RouteHandle struct {
 ID        string      `json:"@id"`
 Handler   string      `json:"handler"`
 Upstreams []Upstreams `json:"upstreams"`
}

type Upstreams struct {
 Dial string `json:"dial"`
}

type Route struct {
 Match    []Match  `json:"match"`
 Handle   []Handle `json:"handle"`
 Terminal bool     `json:"terminal"`
}

type Server struct {
 Routes []Route  `json:"routes"`
 Listen []string `json:"listen"`
}

type singlePayload struct {
 Match    []Match  `json:"match"`
 Handle   []Handle `json:"handle"`
 Terminal bool     `json:"terminal"`
}
// init.go
package caddy

func (cd *CaddyConf) AddCaddyEndpoint(name, ip, port string) error {
 var err error
 payload := Server{
  Listen: []string{":443", ":80"},
  Routes: []Route{
   {
    Match: []Match{
     {
      Host: []string{fmt.Sprintf("*.%s", cd.BaseEndpoint)},
     },
    },
    Handle: []Handle{
     {
      Handler: "subroute",
      Routes: []Routes{
       {
        Handle: []RouteHandle{
         {
          Handler: "reverse_proxy",
          Upstreams: []Upstreams{
           {
            Dial: fmt.Sprintf("%s:%s", ip, port),
           },
          },
         },
        },
        Match: []Match{
         {
          Host: []string{
           fmt.Sprintf("%s.%s", name, cd.BaseEndpoint),
          },
         },
        },
       },
      },
     },
    },
    Terminal: true,
   },
  },
 }
 payloadBytes, err := json.Marshal(payload)
 if err != nil {
  return err
 }

 req, _ := http.NewRequest("PUT", fmt.Sprintf("%s%s", cd.CaddyEndpoint, initConfigEndpoint), bytes.NewBuffer(payloadBytes))
 req.Header.Add("Content-Type", "application/json")
 client := http.Client{
  Timeout: 5 * time.Second,
 }
 res, err := client.Do(req)
 fmt.Println(res)
 if err != nil {
  return err
 }

 return nil
}
We define an init function AddCaddyEndpoint which should be called with name=caddy, ip=node_private_ip and port=caddy_server_port This will make make caddy server available at caddy.nodeid.resource.live and initialise the wildcard certificate for this node. In a nutshell, we make the first subdomain entry on the Caddy server of each node by accessing the node using cd.CaddyEndpoint which is equal to public_ip:caddy_server_port, so that jobs can be added later using the endpoint https://caddy.nodeid.resource.live This init function can be called when a node registers itself in the cluster.
This creates a new caddy route with the host match as *.nodeid.resource.live and adds a upstream for caddy subdomain.
// reverse-proxy.go

func (cd *CaddyConf) AddReverseProxy(name, ip, port string) error {

 req, _ := http.NewRequest("GET", fmt.Sprintf("%s%s", cd.CaddyEndpoint, putConfigEndpoint), nil)
 req.Header.Add("Content-Type", "application/json")
 client := http.Client{
  Timeout: 5 * time.Second,
 }
 res, err := client.Do(req)
 if err != nil {
  fmt.Println("error while making request to caddy", err)
  return err
 }
 var payload_ Route
 defer res.Body.Close()
 err = json.NewDecoder(res.Body).Decode(&payload_)
 if err != nil {
  fmt.Println("Error decoding JSON:", err)
  return err
 }

 payload_.Handle[0].Routes = append(payload_.Handle[0].Routes, Routes{
  Handle: []RouteHandle{
   {
    Handler: "reverse_proxy",
    Upstreams: []Upstreams{
     {
      Dial: fmt.Sprintf("%s:%s", ip, port),
     },
    },
   },
  },
  Match: []Match{
   {
    Host: []string{
     fmt.Sprintf("%s.%s", name, cd.BaseEndpoint),
    },
   },
  },
 })
 payload := payload_

 payloadBytes, err := json.Marshal(payload)
 if err != nil {
  return err
 }

 req, _ = http.NewRequest("PUT", fmt.Sprintf("%s%s", cd.CaddyEndpoint, putConfigEndpoint), bytes.NewBuffer(payloadBytes))
 req.Header.Add("Content-Type", "application/json")
 _, err = client.Do(req)
 if err != nil {
  return err
 }
 // fmt.Println(resp)

 return nil
}
This function first makes a get call to fetch existing caddy routes. It parses the routes and finds the one with host matching as *.nodeid.resource.live We add a new upstream in this route with name=subdomain like job1, job2, ip=node_private_ip and port=job_port Then it updates the appended route on caddy server by making a PUT request.
Since, all the upstreams we added belong to the same route which resolve to the same host, i.e. *.nodeid.resource.live Caddy automatically uses a wildcard certificate which was only generated once during the caddy subdomain entry.
So, after all this hard work, our infra looks like the following:
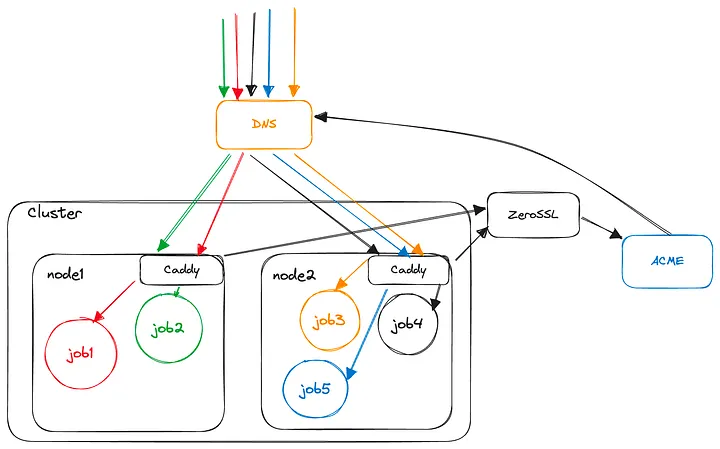 some cool infra
I hope you were able to take with you some learnings after reading the article, or it might have helped someone to figure out how to make Caddy work for them. Reach out to me on my email id [email protected] if you have any doubts regarding the implementation.
Also, a reminder to visit Dashwave and checkout how we are trying to revolutionise the android development experience!
Until Next Time…
Burnerlee